June 5, 2019
I have explained the process for doing a sprayer calibration in a previous post (link HERE)
However, if your nozzles are worn out and not producing the output the manufacturer lists, then your calibration work is essentially wasted. Same thing goes for your gauges, if your actual pressures don’t match what your gauge tells you then there is no way your sprayer will produce accurate results.
Don’t rely on your spray computer to do the work for you either! Spray monitors and computers are prone to damage and wear just like any other part of the sprayer, so its good practice to verify your sprayers output periodically.
That is why I have taken the time to lay out the steps in a how-to video:
The video puts the process forward in easy steps, and there are links to all the charts and templates you need in the description, including a link to download our handy data interpreter program. I will detail the steps below:
Step 1 – Gather your tools
You will need:
A measuring container that holds at least a liter of fluid, two liters is better.
A scale to weigh your sample, the scale should have a tare feature so you are not weighing your container with your sample
A clipboard and pen to hold your worksheet and nozzle charts.
A test gauge and attachment hose, to check your sprayers pressure gauge against.
A timer/watch, to time your sample collection.
A dairy inflation
Not sure what a dairy inflation is? It is a simple rubber device milk farmers use in automated milking machines. It just happens to also be the perfect fit for collecting a sample from a spray nozzle. you can get one HERE or contact us for a supplier.
Step 2 – Prep your sprayer
You should clean your sprayer, rinse it out and fill it with clean water. Make sure the area you are going to be working in is clear and you are not going to give your neighbor a shower.
Open and close each nozzle, make sure they are clean and in good working order
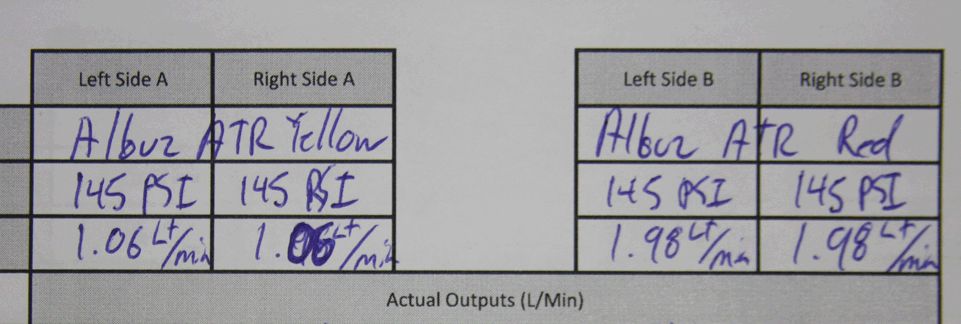
Step 3 – Prep your worksheet
It is best if you work from a template like the one below: (download it HERE)
To fill the sheet out properly you need to find the manufacturers rates for the nozzles you are using. On Munckhof sprayers, this is Albuz ATR 80’s. You can find the charts for them HERE or through the calibration post I linked above.
Find your nozzle, I recommend using the pressure you spray at for your test pressure. Locate the rate the nozzle produces at your spraying pressure and fill out the top portion of the sheet accordingly.
Step 4 – Attach test gauge
The closer the test gauge is to the nozzle, the more accurate the reading will be. It can also help you to determine if you are getting any friction losses between where the gauge on the sprayer is located and the nozzle itself. In the video we attach the gauge at the base of the nozzle boom with a short jumper hose.
Make sure both your test gauge and your sprayer gauge read the same pressure. It is important to check back on the gauges periodically as you are performing your test, sometimes a gauge can develop a slow leak that will cause the pressure needle to drop off slowly. This syndrome can really throw off your numbers!
Step 5 – Data Collection
To collect your sample, place the dairy inflation completely over the nozzle you are going to test (turn the rest of the nozzles off so you don’t get a shower), turn on your test nozzle and using your collection container time out a sample. You can time out one minute or use a lesser time and multiply up to a one minute collection if your container is not big enough to hold one minutes worth of fluid.
To get accurate data, I suggest you weigh the sample and convert (1 floz = 1 USoz, 1 gram = 1 Ml, etc)
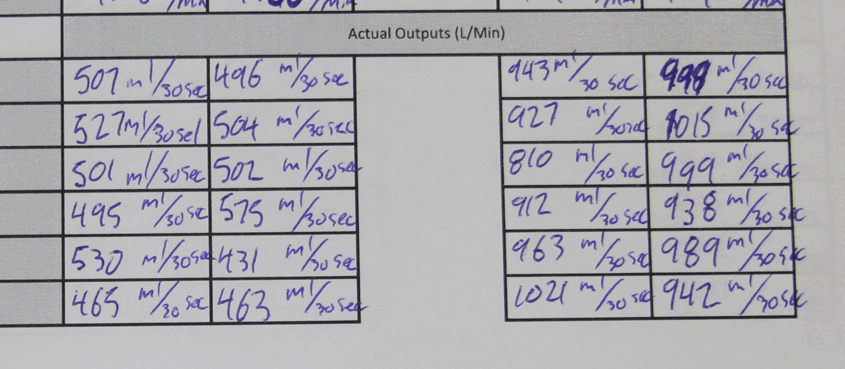
Write your information down on the template until you have a full set of information you can work with.
Step 6 – Log the data
Once you have your information you can check to see how it matches up against the manufacturers rates you looked up earlier.
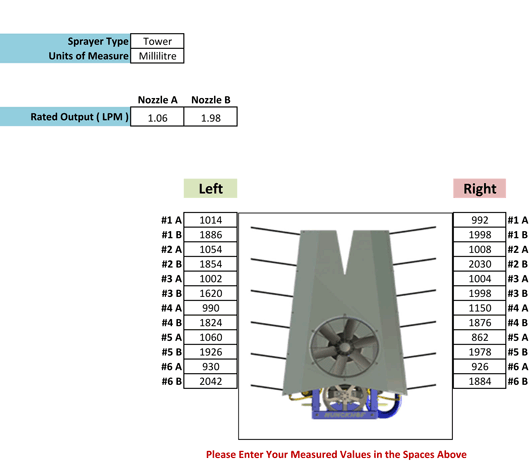
We developed an Excel file to help you with the process, simply enter your sprayer type, the manufacturers rate for the nozzles you’re testing and your collected data, and it will compile a results chart that automatically calculates your deviation in percentages and highlights any numbers that are out of spec.
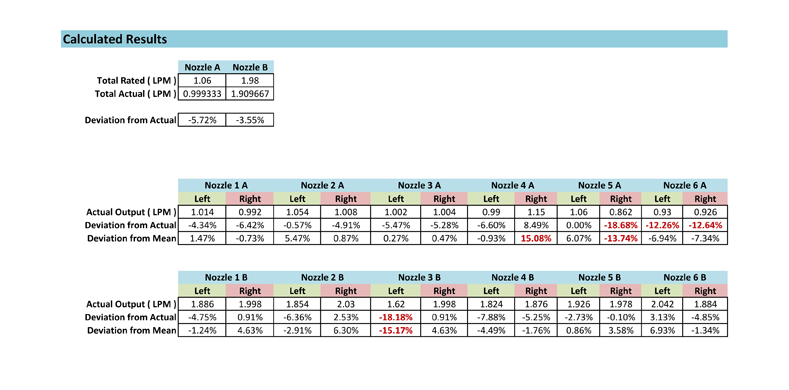
It is recommended to replace nozzles that put out 10% +/- than the manufacturers rate. High rates indicate worn out nozzles, while low rates could be an indication of embedded debris or physical damage.
Be sure to also check the mean average to make sure you are not high or low across the board (this could lead you back towards a faulty gauge)
Download the Excel file HERE
As always we are available to help walk you through the process so feel free to contact us if you get stuck!
 - Munckhof Manufacturing)